
A project management tutorial for starting and staying on track with your redecorating projects

I’m going to switch gears for awhile and talk about a subject that isn’t exactly glamorous, but is important: Project Management. The truth is thinking about a major redecorating project can be daunting. Where do you start? How much will it cost? And so on… pretty overwhelming, right? But with a Game Plan to guide your way, a successful redesign is within reach.
I’m going to breakdown this topic into a series of 3 posts, starting with (duh) “Where to Start”, followed by “Determine and Set-up Your Budget“, and finally, “Set-up a Design Schedule (aka To-Do List) and Project Completion“.
So, let’s get started –
Where to Start
{Figure out your style}
- LOOK – Start finding images, objects, and colors that inspire you. Don’t just look at home decor images; look at fashion magazines, art, landscapes, ANYTHING that you find inspiration in.
- Tip: use an on-line tool like Chip It! By Sherwin Williams to get actual paint colors from your favorite web images
- FILE – Make a Pinterest board, Houzz ideabook, or a good old fashioned file folder – whatever works for you. Note specifics about what you like on each piece you collect.
- SORT – Create a Style Guide
- Now EDIT – narrow down your collection. Do you truly love it? Does it fit into your vision? Is it a current trend that you will soon tire of? Delete any inspiration pieces that don’t truly belong.
- Look at and take note of the elements you are consistently drawn too – what color? What themes (modern, country, etc.)?
- Put words to your style (i.e. tailored elegance with a bit of exotic flair). Don’t think about this too much – Most people’s style isn’t completely modern, or completely country. Just try to identify the major themes you see repeated in the images you curated (bold color, vintage, cozy, etc.)
- Use these terms as your Style Guide when determining future purchases. If something catches your eye, but doesn’t fit into your Style Guide, then determine if it’s just a passing fad or if it’s truly a piece you will love for the long haul (especially if it’s expensive, like furniture).
{Assess and Shop your home}
- Grab a notebook and a metal tape measure and walk through each room you are redecorating.
- Write down how each room is currently used, and how you would like it to be used. Is the dining room currently a dumping room for mail and homework projects, but you’d rather see it used for fun dinner parties? If you want it to actually be used as a dining space you’ll need to consider where all those papers will go.
- Write down what isn’t currently working about each room. Is the Dining Room table too small to accommodate the dinner parties you would like to host? Do you need to consider purchasing a table with leaves that can be expanded for larger gatherings? For each problem you write down, consider a few solutions that might work to remedy the situation – and don’t worry about budget or time write now. Brainstorming ideas, even if they are fantasies, might help you to come up with a valid solution later down the road.
- Get out the camera and take pictures of individual furniture and accessory pieces. Upload them to a site like Houzz.com, or go old-school and whip out the post-it notes and marker to tag your printed pictures.
- This allows you to see each piece individually, taken out of context of its current environment. Now you can “move” pieces from room to room to see where they might look better together.
- Note each piece as either:
- KEEP – keep the piece as-is. Measure this piece for future use
- CHANGE – keep but paint, reupholster, etc.
- DONATE/SELL/TRASH
- Make a list: HAVE and HAVE-NOT (or want, need, you get the point). List the items you are keeping and then separately, determine what you think you will need to purchase in order to complete your project
{Make a Floor Plan}
- Fancy yourself a bit of a techie? Try one of these programs to create your floor plan.
- www.floorplanner.com – 1 project for free ($4.99 per additional project)
- http://www.smartdraw.com/specials/floorplans.asp – free to download
- http://www.homestyler.com/designer – free (and I personally found this one to be the most user-friendly)
- If you aren’t technical, here’s a quick tutorial to do this by hand –
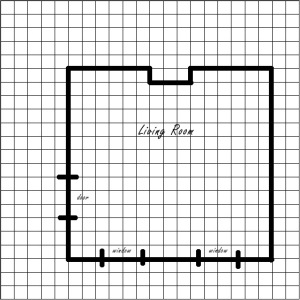
- Grab a friend! Measuring large spans is easier when you have help.
- Use 11 x 17″ graph paper and make each square equal to 1’. So if you measure a wall to be 10’, then draw a line 10 squares wide. If you have large rooms and small paper, you might need to reduce the scale, so one square would equal 2’ (and your 10’ line would be 5 squares instead of 10). Easy, right? Start in one corner and move around the room (either clockwise or counter-clockwise).
- Measure your wall to a door or window and note that width. Now draw a short line perpendicular to your wall line (this will note the start of the window or door opening). Measure the window or door and note that width, marking the end of the opening with another short perpendicular line . Keep working around the room, repeating this process.
- Tip: Do not worry about trim right now. However, just keep in the back of your mind that you may need to re-measure in the future and consider the trim. For instance, let’s say you found the perfect bunk-beds for that nook in your child’s room. The wall-to-wall measurements work out, but just – it will be a tight fit. But if you consider the half-inch the baseboard comes off of the wall on each side, and the leg position of the beds, it might no longer fit.
- Use your existing furniture measurements, as well as measurements from pieces you find on-line, to create furniture templates, also drawn to your one-square-equals-one foot scale. Cut these out (and store them in an envelope or baggie so they don’t get lost). Now you can move them around to “rearrange” the furniture until you figure out an arrangement that might work.

Congrats! You made it through the first steps in getting your redecorating project underway, and you’ve gained some important tools along the way – your very own Style Guide, a Have/Have-not list, and a Floor Plan. Up next – a how-to guide to help determine and set up your budget. If you’d like to be notified via email as soon as this post is available, sign up to follow my blog!

Related Posts
- How To Create Your Decorating Project Game Plan (Part 2)
- How To Create Your Decorating Project Game Plan (Part 3)


Great post, Taryn! very useful tips. I use Pinterest and also compfight.com to get some inspirational images for my mood board. Houzz is also a very useful resource and you found some very useful links for creating floor plans – need to try them too.
Thanks Anna! I’ll have to check out compfight.com. What do you use to create your mood boards?
I cut and collect images from the magazines (usually fashion, travel, interior design, food magazines), pin images that i found in the Internet on my pinterest boards. I use a lot mindmaps – if for example, I need to create a certain mood or style in the interior, mind mapping helps a lot to develop ideas and then I start looking for related images. Photoshop is a great tool to create virtual moodboards, but I like the whole process of cutting and collecting images – it sets me on insipirational mood. 🙂
Reblogged this on KnoGimmicks Social Media & Web Design.
Thank you, Taryn. There are also magnetic boards available for flexible room planning. Great website suggestions.
Thank you Vicki! Do you know where the magnetic boards are available at? I’d love to check them out.
Pingback: Decorate Smarter! How To Create Your Decorating Project Game Plan (Part 2) | Chicago ReDesign
Pingback: Decorate Smarter! How To Create Your Decorating Project Game Plan (Part 3) | Chicago ReDesign